개요 목적
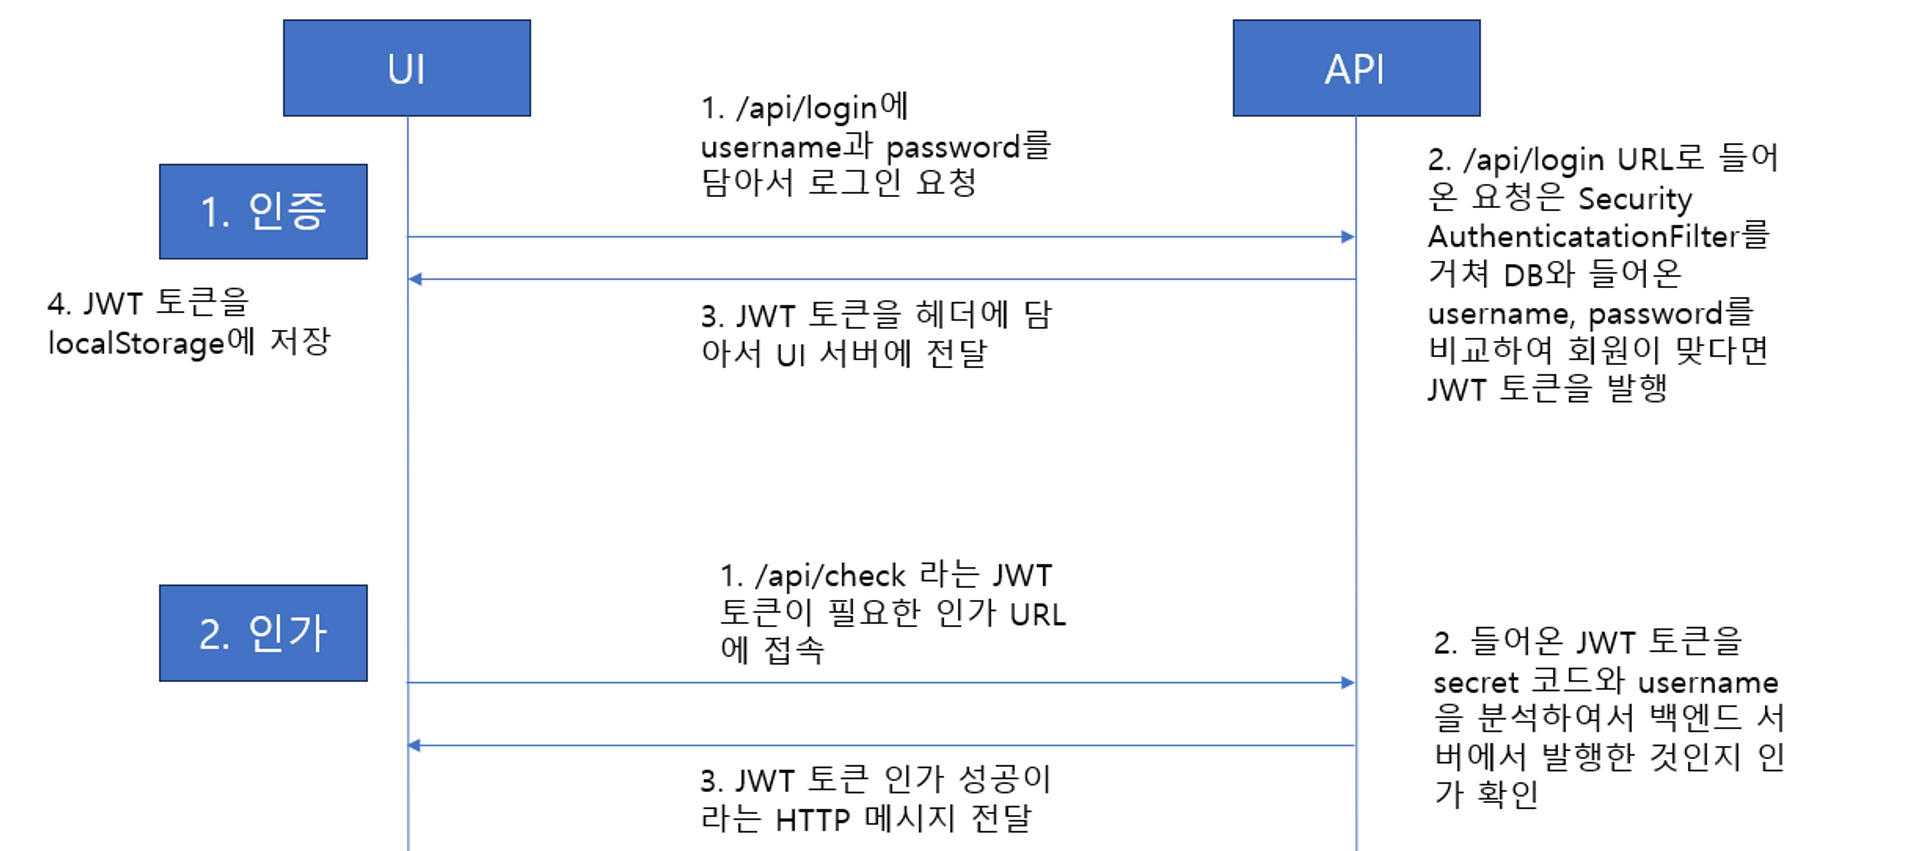
이전 글에서는 Security와 JWT 토큰을 사용한 인증, 인가 서비스를 구현해보았다.
[백엔드/스프링] - Spring Security와 JWT 토큰을 이용하여 REST API 인증,인가 구현하기
이번 시간에는 OAuth2-Google를 기존의 Security와 연결하여 Google 계정으로 인가 서비스를 제공해보려 한다.
기존의 Security와 JWT 토큰을 사용한 인증, 인가 프론트 - 백엔드 흐름은 아래와 같다.
이번 시간에 추가될 OAuth2-Google 흐름은, 구글 계정으로 로그인 한 후 해당 정보를 DB에 저장 JWT 토큰을 발급 전달하는 과정이다. 이 과정이 끝나고 UI에서 똑같이 JWT 토큰을 획득하면 기존 Security 인가 서비스를 그대로 이용할 수 있게 된다.

하나의 요청 프로세스로 구글 로그인 → JWT 토큰 전달까지 해야 하기 때문에 두 번의 redirect가 필요하다. 좀 더 자세한 프론트 - 백엔드 (OAuth 인증) 흐름은 아래 블로그를 참고하면 좋다.
자세한 흐름 알아보기
OAuth 2.0 정보 설정하기
OAuth2 기능을 사용하려면 각 이용하려는 서비스에 OAuth 등록을 한 후 Client_id와 secret을 발급 받아야 한다. google 서비스 등록 방법은 아래 블로그 참고하자.
Google OAuth 인증을 이용한 애플리케이션 개발
그리고 로그인이 완료된 후 Auth token을 받아 나머지 처리를 할 redirect url과 accessToken을 발급 받을 url 마지막으로 profile 정보를 받을 url 정보가 필요하다.
해당 정보를 application.yml 파일에 변수로 등록해준다.
spring:
  config:
    activate:
      on-profile: oauth-local
  social:
    google:
      client_id: 발급 받은 id
      client_secret: 발급 받은 secret
      #로그인 폼 이후에 Auth 토큰을 받아서 추가 처리를 할 redirect url 입력
      redirect:
      url:
        login: <https://accounts.google.com/o/oauth2/v2/auth>
        token: <https://oauth2.googleapis.com/token>
        profile: <https://www.googleapis.com/oauth2/v3/userinfo>
#jwt 토큰까지 발행이 끝난 후 마지막으로 redirect할 UI 서버 url 입력
redirect:
  ui:
    url:
Login Contoller
google 로그인 버튼을 클릭하게 되면, 해당 컨트롤러로 요청이 오게 되고, 해당 컨트롤러는 google loginform 과 로그인 후 redirect할 url이 포함된 주소를 헤더에 담아 프론트 서버에 전달한다.
그러면 프론트 서버는 헤더에 있는 주소로 입장하게 된다. (1,2,3,4 번 흐름이다.)
@RestController
@RequestMapping("/api/user/manage")
public class UserManageController {
    //google 인증 폼 주소를 제공하는 컨트롤러
    //인증을 하게 되면 해당 백엔드 서버 /social/login/redirect URL redirect 되어 auth 토큰을 반환한다.
    @GetMapping("/social/login")
    public ResponseEntity<Void> socialLogin() {
        String googleLoginUrl = oAuthService.getGoogleLoginUrl();
        HttpHeaders httpHeaders = new HttpHeaders();
        httpHeaders.set("Login-Url", googleLoginUrl);
        return new ResponseEntity<>(httpHeaders, HttpStatus.OK);
    }
}
@Service
public class OAuthService {
@Value("${spring.social.google.url.login}")
private String googleLoginUrl;
@Value("${spring.social.google.client_id}")
String googleClientId;
@Value("${spring.social.google.redirect}")
String googleRedirect;
@Value("${spring.social.google.client_secret}")
String googleClientSecret;
@Value("${spring.social.google.url.token}")
private String googleTokenUrl;
@Value("${spring.social.google.url.profile}")
private String googleProfileUrl;
public String getGoogleLoginUrl() {
StringBuilder loginUrl = new StringBuilder()
.append(googleLoginUrl)
.append("?client_id=").append(googleClientId)
.append("&response_type=code")
.append("&scope=email%20profile")
.append("&redirect_uri=").append(googleRedirect);
return loginUrl.toString();
}
}
Google 로그인 후 Auth 토큰 전달 리다이렉트
프론트에서 구글 로그인이 완료되었으면 redirect에 적어둔 아래 컨트롤러로 다시 요청이 오게 된다. String code로 AuthToken을 받게 되는데, 해당 token으로 나머지 작업이 이루어지게 된다.
- Auth token으로 access toekn 구글에게 요청
- access token으로 회원 정보 담겨 있는 profile 요청
3-1. DB에 해당 유저 등록이 안되어 있으면 DB 등록 후 JWT 토큰 발행 후 전달
3-2. DB에 해당 유저가 이미 등록되어 있다면 JWT 토큰만 발행하여 전달
@RestController
@RequestMapping("/api/user/manage")
public class UserManageController {
    @GetMapping("/social/login/redirect")
    public void socialLoginRedirect(@RequestParam String code, HttpServletResponse response)
        throws IOException {
        //1 해당 auth 토큰으로 -> access token
        AccessToken accessToken = oAuthService.getAccessToken(code);
        //2  -> profile 정보 받기
        Profile profile = oAuthService.getProfile(accessToken.getAccess_token());
        //3-1 DB 등록 -> JWT 토큰 발행
        //3-2 이미 DB에 등록되어 있다면 -> JWT 토큰만 발행
        String jwtToken = oAuthService.checkProfileAndCreateToken(profile);
        response.sendRedirect(redirectUiUrl+jwtToken);
    }
}
1 해당 auth 토큰으로 -> access token
resttemplate으로 헤더 규칙을 준수하고 Auth token을 넣어서 accesstoken을 요청한다.
@Service
@RequiredArgsConstructor
@Slf4j
public class OAuthService {
    private final UserRepository userRepository;
    private final RestTemplate restTemplate;
    private final Gson gson;

    public AccessToken getAccessToken(String code) {
        HttpHeaders httpHeaders = new HttpHeaders();
        OAuthRequest oAuthRequest = getRequest(code);
        HttpEntity<LinkedMultiValueMap<String, String>> request = new HttpEntity<>(
            oAuthRequest.getMap(), httpHeaders);
        ResponseEntity<String> response = restTemplate.postForEntity(googleTokenUrl,
            request, String.class);
        try {
            if (response.getStatusCode() == HttpStatus.OK) {
                return gson.fromJson(response.getBody(), AccessToken.class);
            }
        } catch (Exception e) {
            throw new CommunicationException();
        }
        throw new CommunicationException();
    }
		private OAuthRequest getRequest(String code) {
        LinkedMultiValueMap<String, String> map = new LinkedMultiValueMap<>();
        map.add("grant_type", "authorization_code");
        map.add("client_id", googleClientId);
        map.add("client_secret", googleClientSecret);
        map.add("redirect_uri", googleRedirect);
        map.add("code", code);
        return new OAuthRequest(googleTokenUrl, map);
    }
}
2 액세스 토큰을 가지고 profile 정보 받기
같은 클래스 getProfile() 메소드를 통해 profile 정보를 요청한다.
resttemplate으로 요청을 하게 되면 사용자의 이메일, 이메일 인증 여부, 프로필 사진 등 사용자에 대한 정보를 획득할 수 있다.
public Profile getProfile(String accessToken) {
      HttpHeaders httpHeaders = new HttpHeaders();
      httpHeaders.set("Authorization", "Bearer " + accessToken);
      HttpEntity<MultiValueMap<String, String>> request = new HttpEntity<>(null, httpHeaders);
      ResponseEntity<String> response = restTemplate.postForEntity(googleProfileUrl, request,
          String.class);
      try {
          if (response.getStatusCode() == HttpStatus.OK) {
              return gson.fromJson(response.getBody(), Profile.class);
          }
      } catch (Exception e) {
          throw new CommunicationException();
      }
      throw new CommunicationException();
  }
3-1 3-2 JWT 토큰 발행
profile로 받은 정보를 통해 해당 유저가 등록된 유저인지 신규 유저인지 파악 후에 JWT 토큰을 만들어서 프론트 서버에 전달할 준비를 한다.
@Transactional
public String checkProfileAndCreateToken(Profile profile) {
    Optional<Users> byUsername = userRepository.findByUsername(profile.getEmail());
    //이미 DB에 유저 정보가 저장되어 있다면, JWT 토큰만 발급
    if (byUsername.isPresent()) {
        Users users = byUsername.orElseThrow();
        return createJwtToken(users.getId(), users.getUsername());
    } else {
        //DB에 존재하지 않는다면 DB 저장 후 JWT 토큰 발급
        Users save = userRepository.save(
            Users.builder().username(profile.getEmail()).name(profile.getName())
                .provider("google").roles("ROLE_USER").emailAuth(false).password("NO").build());
        return createJwtToken(save.getId(), save.getUsername());
    }
}

private String createJwtToken(Long id, String username) {
    String jwtToken = JWT.create()
        .withSubject(username)
        .withExpiresAt(new Date(System.currentTimeMillis()+ JwtProperties.EXPIRATION_TIME))
        .withClaim("id", id)
        .withClaim("username", username)
        .sign(Algorithm.HMAC512(JwtProperties.SECRET));
    return "Bearer "+jwtToken;
}
마지막 UI Redirect 접속 JWT 토큰 저장
백엔드서버에서 response에 redirect 정보를 담아서 JWT 토큰이 완성되면 토큰 정보를 담아서 프론트 서버로 두 번째 리다이렉트를 하게 된다.
@GetMapping("/social/login/redirect")
public void socialLoginRedirect(@RequestParam String code, HttpServletResponse response)
    throws IOException {
    AccessToken accessToken = oAuthService.getAccessToken(code);
    Profile profile = oAuthService.getProfile(accessToken.getAccess_token());
    String jwtToken = oAuthService.checkProfileAndCreateToken(profile);
    //JWT 토큰 정보 담아서 프론트 서버로 마지막 리다이렉트
    response.sendRedirect(redirectUiUrl+jwtToken);
}
그러면 아래 프론트 컨트롤러에 요청이 오게 되고
JWT 토큰을 local storage에 저장한 후에 해당 JWT 토큰을 가지고 기존 Security 인가 서비스를 이용할 수 있다.
@Controller
@RequestMapping("/user/manage")
public class ManageController {

    @GetMapping("/oauth")
    public String oauth(@RequestParam String token, Model model) {
        model.addAttribute("token", token);
        return "user/oauth";
    }
}
실행 결과
Reference
https://gilssang97.tistory.com/58
'Web Sever 개발과 CS 기초 > 스프링' 카테고리의 다른 글
| HTTP 서버를 편리하게 만들 수 있는 HttpServlet 이해와 사용법 (0) | 2023.05.13 |
|---|---|
| Java로 직접 구현하는 HTTP Server (0) | 2023.05.13 |
| 스프링 알림 기능 - Spring Data JPA DB 구현 (0) | 2023.05.11 |
| Spring - MySQL과 Querydsl 통계 쿼리 처리(group by, Expressions) (0) | 2023.05.01 |
| Querydsl를 사용한 동적 쿼리 만들기 (1) | 2023.04.29 |


